Search This Blog

Showing posts with label sensors. Show all posts

Monday, 20 August 2018

Esparto V2 almost ready! The new web UI part 4

The lower panel(s)


Info

This is mostly self-explanatory but also raises a few points that are well worth knowing if you intend to become an "Esparto Expert".

These are all static values at the heart of the system, some of them permanently, some for example the IP address for this boot of the system only. They cannot be directly changed by the user. For some that can, see the next section.

Hardware Type:


This lets you know what's running "under the hood". It can be any one of these:

  • ESP-01 (but why would you bother when there’s…)
  • ESP-01S
  • Wemos D1
  • Wemos D1 mini
  • Wemos D1 lite (and thus probably any other ESP8285 device)
  • Wemos D1 pro
  • NodeMCU 0.9
  • SONOFF Basic
  • SONOFF S20
  • SONOFF SV

Esparto has been tested on all of the above. It will probably run on anything with an ESP-12 in it, but obviously I can't test every single device on the market/ If you want to send me one to try it out and modify if necessary...

I will be very interested to hear of anybody getting it running on any other platform e.g. NodeMCU 1.0 will probably work, as will (I expect) other SONOFFs


Unique Hardware ID:


This is the last 6 digits of the MAC address and is commonly used in new-out-of-the-box scenarios as a default name before choosing your own and setting your SSID / Password credentials the default name of the demo device would be ESPARTO-17D383. See part 2 earlier for more detail on this value and advice renaming your device to replace it.


IP Address:


Need I say more?


Flash Memory Size:


Same as above, except the answer is "Yes". 

Esparto weighs in at  over 410k - it has a lot of functionality and features. To support OTA updating (and who wouldn't want that?) a "sketch" (app) has to be able to fit into half the available flash size. On smaller devices e.g. the SONOFFs you get 1MB thus 512k is usable if you want OTA (and you do!).

As you can see things are already starting to squeak, so you need to keep your own additional code
small, efficient and light-weight. There is also a very limited amount of heap left. Esparto starts up with about 27k free, and that can go up and down rapidly - see the graphs in part 3 of this series for an example. Keep your heap use to a minimum and guard any heap-using routines with a check in what's free first if you want to avoid crashing (again, you do!).

The good news is that Esparto does so much for you that your own code will be small and consist mostly of short callback routines that Esparto will execute at the relevant time on your behalf. There is no loop() function and no setup() function. You will rapidly get used to doing things the "Esparto Way" once you see how easy it is.


H4 library version number:


If you want to get further than a simple "Blinky" it helps to understand the structure of Esparto. It is built from 3 main libraries, H4, SmartPins and Esparto itself.

H4 which handles all the timer functions, scheduling, task separation and "slip streaming" of asynchronous functions into the synchronous task queue which runs on the main loop. No more WDT resets, no more "volatile"s. When your task runs, it is (almost) the only player in town and the H4 library makes sure you have to try really really hard to break things or upset other tasks.

It comes with 7 of its own examples demonstrating how each and all of its functions work. Esparto "encapsulates" H4, so all of the H4 functions will appear to you as identical Esparto functions, so you do need to understand these first.


SmartPins library version number:


See above. Note the version shown is incorrect - by the time of  release it will also be 2.0.0 (actually it is, but I forgot to update the version number field before the demo - my bad!)

SmartPins as its name suggests manages all the input and output pins for you. It is what enables Esparto to give you the fancy real-time flashing LED display for all the pins. It also does everything you could ever want to do with a pin, including debouncing, interrupt handling (although there are good reasons why you would probably never need to use it), rotary decoding and much more.

The Encoder input type lets you manage a rotary with a single line of code - you tell it the name of a variable, and whenever you access the variable it will automagically have the current decoder value in it. One line of code! It's my favourite Esparto feature: most of my own mini-apps have some kind of "tweak" factor using a rotary, it's so easy. Some even have two...at the extra expense of one more line of code...I'll stop now, I think you have got the point.

SmartPins comes with nineteen sample program covering every in and out (literally!) of the many types of input modes it supports. It also has access to all H4's functions and relies on it 100% to function. Pretty much every example has at least one or two H4 features though of course they appear seamlessly as identical SmartPins features.

It is important then to work through the examples in order to fully understand the power and flexibility of Esparto, because in the same way, all Esparto functions are automatically the same as all SmartPins functions.

Even seasoned programmers will benefit, as Esparto works in a very different way from 99.235% of all the thousands of sample sketches you will find online. You need to learn the "Esparto Way", but for those with experience it won't take long at all.

Just as an example, here's the code (with comments removed for brevity) for the simple blinky. "Simple" includes having a fully debounced on/off switch unlike 99.476% of other blinkies.


NOTE: 

While H4 and SmartPins both have visible setup() and loop() functions, Esparto does not. There are two reasons for keeping them in:

  1. To make the early examples more readily recognisable and ease you in to the "Esparto Way" and "chunk up" the amount of learning at each stage into bite-sized pieces.
  2. To enable you to use them on their own without the full Esparto, although I can't think of any reason why you would want to unless you are the kind that likes to make things deliberately hard for themselves

#include <SmartPins.h>

SmartPins smartPins;

void buttonPress(bool hilo){

  if(!hilo) smartPins.flashLED(250);

  else smartPins.stopLED();

}

void setup(){

  Serial.begin(74880);

  Serial.println("LED will change state (flashing/off) on each separate button up/down press");

  smartPins.Output(BUILTIN_LED);

  smartPins.Latching(0,INPUT,15,buttonPress); // GPIO 0 + 15ms of debouncing

}

void loop(){

  smartPins.loop();

}

I hope you will agree both that it's pretty easy and also that you get "a lot for your money" for very little coding effort. That principle underlies the whole of the "Esparto Way": Esparto does 90% of the "heavy lifting", you plug in the remaining 10% which is specific to your IOT / home automation app. Esparto allows you to concentrate on just the code that's important to you - all the hard stuff "just works"


NBoot & Code:


These may be the first indication of a (hopefully very rare) problem. NBoot is the number of times this device has been rebooted and "Code" is the reason why. If it has just been freshly programmed then (as has the demo device) then it will read ESPARTO_BOOT_UNCONTROLLED.

What this means is that it was not shut down by user action, but forcibly rebooted, as the IDE does. You will also see this code if the device crashes for any reason.

If you click the Reboot button,. the code will become  ESPARTO_BOOT_UI. If you send an MQTT command e.g. testbed/cmd/reboot the code becomes ESPARTO_BOOT_MQTT and son on, although obviously you will replace "testbed" with your own device name first.

If you see an increased boot count and a reason you don't expect - something has gone wrong!

The "tXXX" values:


These measure the amount of milliseconds since boot up when:

tHW: 

The time after which your sensors, buttons, relays, remote controlled Gatling guns etc become ready to run. One of the fundamental design goals of Esparto is that your hardware should operate a) as early as possible b) whether you have a WiFi connection or not c) all the time, always.

Even if - as happens in the real world - bugs occur and the occasional crash occurs, your hardware will be back up ready to go in about 125 milliseconds. Impressive, non? It's one of the reason behind why Esparto won't let you play with setup() and loop(): it has quite a bit of complex setup of its own to do, and it has to happen fast, and in a very specific order.

tWiFi:

The time after which you can load up the web UI because your device now has a valid IP address.

tMQTT: 

Similarly, the time after which Esparto is actively listening for MQTT commands, both its own any any that you choose also to listen for. All Esparto command start with "cmd", so you must not use this in any of your own topics, or who knows when that Gatling gun may go off in error?

High values of either tWiFi or tMQTT may be early indications of problems with your router, network or MQTT broker. Or they may just be a sign of a slow network - only you will know. Personally, I'd worry about anything much more than the demo values. Again, I think 3.2 secs from power on to receiving MQTT commands is "in the zone".

Esparto V2 almost ready! The new web UI part 3

The lower panel(s)

System


This panel will be used mostly for debugging your Esparto App. The ADC graph shows the raw value of the A0 pin from 0 to 1023 and can be useful when calibrating any sensor attached thereto.

The Heap graph:


The heap graph is probably the most important tool here. The ESP8266 has limited heap space and many of the underlying libraries chew up a fair amount. The main AsyncWebserver library is also very sensitive to low heap situations and despite it being a truly marvellous piece of software, it will crash unceremoniously if there is very little free heap space. I have not gone to the lengths of calibrating it exactly, but below 5 or 6k seems to be in the danger zone. Get the software on github.

Running out of heap is fatal in all circumstances and great care must be exercised in your code to make sure you use as little as possible. The graph is designed to help you do that. The window is 3 minutes wide, which is more than enough time to spot any problems. Trust me, when they happen, they happen fast!

Esparto has a built-in heap guard so that it will not let any process start if there is less than a defined amount of heap available. The value is configurable at compile=time and I usually run with it set to 20% of the initial free heap. You may need to "tweak" it while watching this graph to optimise the figure for your own app.

The downside of this is that once the limit is reached, any / every event requiring a task will be silently ignored, This can make your app behave strangely: LEDs may stop flashing, sensor values may not get sent to MQTT, your buttons may not work, or worse: work on the down stroke, but not on the up. The point is that whatever happens, the app will not crash. It reserves at least enough heap (I hope!) to be able to call up the UI panels so that you can spot the problem with this panel, fix it perhaps by changing a configuration value on the config panel or use the run panel to issue a command to stop the bad behaviour, while letting the good stuff continue. That's the idea, anyway.

The Q panel shows the size of Esparto's task queue. Most of the time this will read zero, i.e no outstanding tasks. Technically it should show at least one, but it clears the queue so quickly and the stats are only refreshed once per second, so they "miss" the occasional internal background management task. This raises an important point: all of these statistics (apart from the ADC) are indicative only: they cannot be 100% accurate (nor do they need to be) by simple virtue of the lag between the actual event, the network and the browser. They are certainly accurate enough to help you spot problems very early on and then tune them out.

Again, the queue can be sized at compile-time and some experimentation may be needed to maximise free heap with a small queue - but not so small that tasks start stacking up or being "throttled". The same caveat applies: once the queue limit is reached, tasks will be ignored until the level drops below the limit. All the same glitches as above may or may not occur, but still: no crash. In any event it is 90-odd percent certain the heap will be throttled well before the Q grows out-of-bounds.

Warning!

There is one sure-fire way of busting the queue: scheduling a repetitive task that runs for longer than the scheduling period. For example running a job every 5ms that takes 6ms to complete. It doesn't take much thought to realise that this situation is never going to end well. The queue will grow exponentially and given that 10 or 20 is a sensible practical limit, the rate of growth before throttling occurs will be of the order of milliseconds. You already know what starts (or more often "stops") when these limits are reached.

Another "don't try this at home, kids" method is to schedule a taks that schedules another, which schedules...etc in a chain which is longer than the queue size (minus 1 or 2 for system tasks). Granted, its rare and difficult to do, but here is almost certainly a better and safer way, so if you are thinking of long chains of tasks to get some wacky timing working, think again...

Not least for the fact that again timings are not 100% reliable: they depend on other tasks in the queue. If your new task to start in 10ms slips in behind one that is scheduled to run before yours and takes 15ms then yours wont start for 25ms: his 10 and your 15. If however the queue is empty - which it usually will be - then yours will start on time. The moral of the story is: don't run a nuclear power station or your mother's life support system with Esparto. Most other stuff will work just fine.

The Pins Graph:


Pin activity is the main culprit in heap depletion: Esparto has quite a lot to do when a pin change occurs. It has to check to see if the pin is throttled (more on that in a moment) and if so, discard inputs over the throttling limit, if the input survives that, Esparto has to light the appropriate raw LED then allow the specific pin-type handler to decide / calculate / guess (only kidding) the internal cooked state, get the value and light or extinguish the corresponding cooked LED. And update the pin statistics, and...

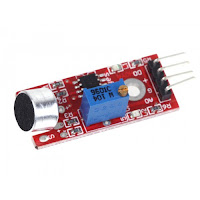
All of which uses up heap space. The snapshot above was deliberately chosen to show how a burst of high activity on the pins causes an immediate and severe drop in the free heap space. In case you are interested, it was caused by flashing 3 LEDs at a high rate while simultaneously "listening" to a sound sensor like this:
Cheapie sound sensor for ESP8266


on pin D6 while Motorhead's "Ace of Spades" was playing at high volume. The track was chosen specifically because it is a "wall of noise" and causes the sensor to throw literally thousands of transitions per second into the pin, which brings us nicely on to Esparto's approach to pin throttling...

PinThrottling:

Very few ESP8266 apps can sustain thousands of transitions per second (peaking at 11000+ form Motorhead when turned up loud, which is - of course - the only way to listen to it) while also managing other hardware and a dynamically-updated web UI. Esparto is no different: it's not magic! It depends on underlying libraries that have limits. For example the AsyncWebServer library can only deliver about 20 requests to the browser per second. This of course depends on how fast the browser can consume them but when you look at what Esparto is doing on this panel alone, there's a lot to get through. By empirical observation, 21 inputs per second is the tipping point at which the heap starts to drop like a heavy rock. The chosen tune has no let-up, once the descent begins there's no way back before a very rapid heap exhaustion crash, except to  a) throttle the heap b) throttle the cause of the problem rather than the symptom: the rate of throughput on the input pin. Esparto does both.

So the LED is never going to flash in time with the beat. Cutting the rate from 11000+ to 21 is obviously some heavy clipping, but it is essential to prevent a crash. It's actually worse: because of some background tasks, even at 20/sec the heap depletes, albeit slowly. It doesn't actually stop entirely until 19. Unfortunately the ESP floating point code is so big and Esparto already weighs in at 410k that Esparto can only deal with integer arithmetic - for speed as much as size - but size is what prohibits "proper" math. So when calculating the throttle sample rate, 19 gets rounded down to 10.

The count on the pin is sampled 10x per second which is 100ms between checks. This is a fine balance between early notification, accuracy and impact on other process. Pin D6 is throwing 1s and 0s in at 11000 per second (that's 91 microseconds between) so the first time we get to check the pin count, it's already up to 1/10 of it maximum which is 1100 - a heap-busting amount of activity.

The maths behind this problem is much deeper than we need to get into here, but the result is that in its current guise, Esparto can only throttle pins in multiple of 10. Doing it at 20 would be accurate, as would 30 - or 10. Anything in between is rounded down by the integer divide. Rounding it up wouldn't make a lot of sense for a limit, now would it?

As a slight aside, the reason that pin D6 (GPIO12) is coloured yellow in the UI snapshot above is to indicate that it is throttled.


Wednesday, 1 November 2017

Esparto v2.0 - sneak preview: Inside

"A picture is worth..." as they say:

The following 21 lines (one of which is a comment...) are all you need to turn a Sonoff Basic, S20 or SV into an MQTT device with a web interface...etc etc as described in the previous post "...outside". If you don't want diagnostics, you can lose the Serial,begin and cut another line.

The Sonoffs have a push button on GPIO0 and a mains relay on GPIO12. That's all they have, hardware-wise

#include <ESPArto.h>
// ToiioT-Etage is my SSID, pw="" (I live in the forest) my raspi mosquitto is on 192.168.1.4
ESPArto Esparto("ToiioT-Etage", "", "esparto666", "192.168.1.4", 1883); 
void buttonPressed(bool hilo){
  if(hilo) toggleRelay();
}
void mqttSwitch(String topic,String payload){
  toggleRelay();
  Esparto.publish("state",digitalRead(12) ? "ON":"OFF");
}

void setupHardware(){
   Serial.begin(74880);
   Esparto.Debounced(0,INPUT,15,buttonPressed); // 15 = ms debounce time
   pinMode(12,OUTPUT); // relay / switch
}
void onMqttConnect(){
  Esparto.subscribe("switch",mqttSwitch);
}
void toggleRelay(){
  digitalWrite(12,!digitalRead(12));
}

And the code above is all they need, and I ask you: "What could be simpler?"

True, you will have to physically FLASH upgrade it first time with a FTDI adapter, but after that, Esparto will update itself automatically as needed. It will appear on your WiFi network as esparto666.local and respond to an MQTT "switch" command, by toggling the power relay and will reply with an MQTT "state" message with a payload of "ON" or OFF". It will reconnect after any network failure and all the while, the manual button will still turn it on an off.

Plus it's inside your own network. No snazzy (but often rubbish) App to download. No security problems. No worrying if XYZ corp go out of business and close their cloud, that your lights will never work again...If you can use a web browser, you can control it. If you have an MQTT server, you can control it in much more detail. If you have a NODE-RED server, you can start to do really clever things with your whole house.

Let's look inti the code in more detail (shouldn't take long)

It doesn't look much like a typical Arduino sketch. There is no setup() function and no loop function. Esparto takes care of both, to make sure things are done in the "right" order and to prevent your code from accidentally breaking things or stopping it working.

Your code is all driven asynchronously by Esparto using callbacks. If you don't know what that means, you need to read the sidebar articles under "Essential Information". It starts with setupHardware. This is where you do what you'd normally do in setup. Having said that, much of what you'd "normally do" isn't needed any more.

Esparto.Debounced(0,INPUT,15,buttonPressed);

Tells Esparto that you want the button on GPIO0 debounced (for 15ms) and to call buttonPressed when someone pushes it or lets it go - i.e. when it changes. When it goes HIGH (the button on a Sonoff is "reversed" in sense: it goes LOW when you press it and HIGH when released) the relay is set to the opposite of what it is now. If its already on, it goes off etc - and that is the same as the standard firmware that it comes with when you buy it.

When Esparto has established a valid MQTT connection it calls onMqttConnect. Here, your code tells Esparto you want to receive "switch" topic message and when it gets one, it will call your code in mqttSwitch. As for a button press, you call toggleRelay which then publishes the current switch state to MQTT.

"And that's that"...as they also say.

Adding sensors to a "homebrew" board and adding lots of functionality on top of this is going to get more complex of course, but Esparto is designed to take a lot of the hard work out of that process too. It has a lot of "Hooks" where you can add callbacks in exactly the places you need to create a new "layer" of your own HA system on top of Esparto. That's how my own Chez Toi ioT system works: 90% of the code in each device is Esparto. Esparto has 9 different types of input pin it can manage for you, including rotary encoders and each of those only require one or two lines of code.

As an example my truc firmware when I fisrt wrote it was about 1200 lines of (pretty hairy) code and a lot of bugs. Now it handles GPIO on every pin of a WemosD1 and runs temperature PIR, sound, light, button and touch sensors. It also controls 433MHz RF switches, and it auto-updates itself. It's far more robust, easier to control and has two web pages (one of which is a live GPIO view) when the old one had only one very basic config page. Using Esparto, its only about 300 lines long and most of those 300 lines are a lot simpler and a lot more obvious to read.

But the biggest "gift" it brings is this: it runs all your code on the main loop thread, in a non-overlapping "job queue". All asynchronous events are "serialised" into the queue so no more problems of resource clashes, hangups, WDT resets and a hundred other headaches. It also provides tools for you to do the same from your own code. Each task runs separately in turn and can't interfere with/break/stop any other task, unless you deliberately make it do so. Again, if you don't know what all that means, read the "Essential Information" but what it translates to is: It prevents you from accidentally falling into about 90% of the common traps that newcomers fall into - and not all of them are obvious even to some experts. Some of them confuse experienced programmers for days and make grown men weep. Kiss 'em all goodbye.

It's fair to say that some of the complexity that Esparto hides (by deliberate design) would easily put off a lot of beginners, so having "MQTT in a box" is a huge help to getting started in the world of Home Automation and IOT. Now its absolutely true that if you can write a simple sketch to flash an LED you can also write one to produce your own Sonoff firmware. How's that sound for starters?

Of course Sonoff aren't the only player in town: that exact same sketch above will compile and run on Wemos D1, NodeMCU and (with a touch of "fettling" and shifting pin 12 to e.g. GPIO2) even an ESP-01 or ESP-01S.

Esparto is the result of 2years' worth of  thousands of mistakes, false starts, burned fingers, frustration and swearing - so that you don't have to go through it all again yourself.


Esparto v2.0 - sneak preview: Outside

"Esparto" is a type of coarse grass. That's neither here nor there really but it's a nice name for this Arduino ESP8266 library. Originally it stood for ESP All-purpose Run-Time Object, but it could just as well be "ESP All Ready To Operate" because that's what it is.

It is a C++ class object which does almost everything you need to do to turn your Wemos D1, NodeMCU, ESP-01S or Sonoff device from a pretty brick into an MQTT-controlled IOT device. Some folk would call it "firmware" and indeed you can upload a binary if you choose, but the real power comes when you extend it yourself with your own code.

As it stands, it will connect to your WiFi and MQTT controller and automatically reconnect after they fail - without rebooting. It will give you a visual (near*) real-time view of all the GPIO pins, with the correct labels on each depending on the device its deployed on. It will accept OTA updates and runs a web server that allows simple reconfiguration.

Using MQTT you can switch it on of off, reboot it (though you shouldn't need to) or factory-reset it. You can even dynamically change its deviceID and SSID+Password. You can read or write any IO pin and/or reconfigure them. What that last one means exactly will become clear later. Through all of this the basic on/off functionality will continue to work, even if your MQTT controller or complete local network are down.You don't need someone else's cloud and a flaky app on your iPhone. Anything that runs a web browser inside your network can control it. So even without your own additional code, it already does a lot.

Once you start adding your own code, the world of Home Automation and IOT is your oyster. In the example that follows, the device is running mu own Chez Toi ioT "truc" firmware, which provides a common interface for a number of sensors (PIR, light, sound, temperature) adds RF433MHz "dumb" switch control and stores the location and function of the device so that the NODE-RED controller can present a smooth UI for the overall management of the whole system.

Basic Esparto:


From the top: Device name, SSID+password change. No reboot, it just reconnects to the new settings. You will need to browse to another "devicename.local" page of course if you change the name or another IP page if the new SSID has a different range.

We'll come back to the "settings" cog icon in a moment, but the yellow circular arrow reboots the device and the factory icon resets it to as close to its original state as possible.

The next panel shows the current state of all the GPIOs, each labelled appropriately for the type of hardware its running on. The top row is the "raw" state of the pin, i.e. its instantaneous value, irrespective of what is connected to it. If it is configured as an output (e.g. the LED or RELAY in a Sonoff device) clicking the top row pin will toggle the state and switch the GPIO on or off. The bottom row will make more sense in the next article when we look "inside" at the code, but for now, just know that these are what Esparto calls the "cooked" state.

Esparto is based on the SmartPins library, which is itself based on the H4 timer / scheduler library. (See the side panel links to these for full documentation - all the functionality will be available in Esparto V2.0, plus a lot more of course. Or see http://github.com/philbowles/smartpins and http://github.com/philbowles/h4) . I'll also cover in the next post why those are both "good things" and will save you months of pain. SmartPins defines number of useful input types such as "debounced", "latching", "encoder" and several more. It does all the work to manage the pin, keep those lights updated and call your code back when the pin changes. So a "raw" button which is bouncy will flicker on and off as it bounces, but once SmartPins has done all the hard work and debounced the pin it puts the corresponding bottom line "cooked" pin on and calls your code. 

The next panel shows some vaguely-useful static information and the final panel shows dynamic information - including MQTT connection status - which is useful when you start adding your own code.

Back to the "setting" gear wheel. Out-of-the-box it will give you a "404" error. That is because it links to a "config" page that you add for the extra functionality that your code provides. Esparto has been specifically designed to make this easy for you, and we'll see just how much so in the next article. For the moment let's look at what Chez Toi ioT "truc" firmware adds:


Chez Toi needs to know where each device lives, to "wire together" important sequences, e.g. "Going to bed" turns on the bedroom light and the landing light and maybe later, the heater if the temperature is below 14degrees. Much of that added "intelligence" is in the raspberry Pi NODE-RED controller in order to keep the code "footprint" in each device as small as possible.

By knowing the location and function, I can add MQTT commands to turn on all devices in a zone, or all floor lamps in the whole system. "Restart" determines if the device is on , off or whatever it was before in the (rare) case of reboot or power outage. A safety nightlight for example would be (as before) but generally "off" is safest.

The numbers (all in milliseconds) are the configuration values for the sensors. PIR(t) is the PIR timeout and PIR(h) is its "hysteresis", meaning the "dead time" between two movement events to prevent it flicking on and off too rapidly. Sound is the timeout value for the re-triggering sound sensor, and light and temp are the frequency to poll those two sensors, since they change slowly.

This particular "truc" is also an RF master controller. When it switches on, those three 433MHz switches will also go on. Or off, of course. Clicking on any will toggle its current state to allow  degree of "manual" control. No more searching for the handset - any browser-capable device will do, tablet, phone, PC etc.


Testbed 4 - more sub-assemblies: temp and rf433

This one has the (very "bouncy") tact button that all my IOT devices have on GPIO0
  • quick press: switch on / off
  • medium: reboot
  • long: factory reset


It also has the TMP36 temperature sensor and the output module to transmit RF codes to my "el cheapo" sockets: These are what I bought for the 300+ year old farmhouse before I had the (insane) idea to replace everything with a fully-fledged WiFi IOT Home automation system.


Being one who doesn't have a lot of cash to splash, I wondered if I could re-use them...Then I found the wonderful rcswitch library https://github.com/sui77/rc-switch and I found some ridiculously cheap RX/TX pairs on ebay (buy similar here) 5 sets for eu2.79 or 56c a pair. So the TX you see here set me back - what - 28c? I love cheap.

Setting it up was easy: The rcswitch lib has an example that uses the RX to read the codes of the handsets. I was short of Wemos D1s at the time, so I dragged a dusty old Arduino UNO out of a drawer and had the code running in about five minutes flat. I captured all the codes from my four handsets for on and off. I then knocked a little transmit library for the Wemos with a few "hard-coded" values and no-one was more surprised than me to hear the happy sound of clicking less than an hour or so after I started! Tweaking the code, removing the hard-coded values and setting up the automatic re-configuration then occupied me for the next few days, of course...

Now my system uses these as "slaves". Each "truc" or Wemos-controlled "big box of sensors" reads MQTT configuration data at startup to see which RF switches are linked to it. When it next switches on or off, it automatically sends the RF codes to make all its "slaves" match. In the real world, the main box would be wired in with the overhead light in each room, and the el-cheapos would be floor lamps, or corner lamps. When commanded either by touch or remote MQTT, all go on/off at once.


Testbed part 3 the Wemos sub-assemblies

I like to try various different (cheap) sensors to find which ones are best in terms of:
  • build-quality
  • flexibility
  • size (they have to fit into Small boxes eventually)
  • price (as I'm going to need several of each)
To make life easier, I have done two things: 1) I have made everything modular from the start so I can just "swap out" various gadgets. This also makes testing the code a lot easier too: it's done one chunk at a time. 2) I have modularised my code too and written a library which adapts to pretty much any sensor type and does all the "heavy-lifting" for me. Try it out: http://github.com/philbowles/smartpins

The library is what allows me to do this in my main IOT firmware "Esparto":


Which is a real-time display of what all the pins are doing. One neat feature is that the pin descriptions change for each board type (NodeMCU, Sonoff etc)

Anyway, the "main" sensor module looks like this when dismantled:


And like this when assembled with the smaller of the PIR sensors:


There is plenty of debate as to whether the ESP8266 can tolerate 5v on its GPIO pins. A lot of folk say you can - but I'm not going to chance it when a) 3,3v works fine with most sensors* and b) once my IOT devices are deployed, I can't afford to rip down walls or climb ladders when I find out that most folk meant "...for a while" and never "soak-tested" their findings...Always best to play safe where electricity is concerned, as I have found (to my - ouch - cost) on more than one occasion.

*The PIR sensors are a good example. The larger one has an onboard 3.3v LDO, so even when fed 5v, the signal out is only ever 3.3v max, so it goes straight into a GPIO. Oddly, even when fed only 3,3v, it still works fine. The smaller one (fitted) will run with 3.3v but it  will not trigger. It has to have 5v to function properly.

The light and sound sensors are both marked with 5v Vcc on the boards, but both work fine with 3.3v - some don't and that's why a) I went modular  b) experimentation is the only true way to find out - but test the OUT pin with a meter first!!!