Let's see it working. Second apology: I'm sorry about the distracting voiceover on the video but I discovered that Facebook recognises audio content and mutes them if it detecs copyrighted content! It's both unnerving and clever. Since I chose David Bowie's "China Girl" for the demo, I fell foul of the rule, of which - up until that point - I was blissfully unaware! I broke the system by talking loudly over it and re-uploading.
Now I guess that flashing LEDs on ESP8266s are not a new thing, but the whole point of the demo is this, which I hope is more surprising:
#include <ESPArto.h>

ESPArto Esparto;

void setupHardware(){

    Esparto.Output(LED_BUILTIN,LOW,HIGH);

    Esparto.Raw(D6,INPUT_PULLUP,[](int v){ if(v) Esparto.pulseLED(1); });

}
No, there is nothing missing: that's the whole code! And it "just works" as you can see from the video. Yes, there is no setup() function and no loop() function. Esparto takes care of all of that. It manages the whole of the ESP8266 hardware (with all its complexities and traps waiting for the unwary beginner) and calls your code only when it is safe to do so. This means no more random crashes, WDT resets and other common "gotcha"s.There's not much to explain, the pinMode does what the standard Arduino pinMode does, and a little bit more. The two extra parameters tell Esparto when the pin is "active" i.e. what binary state constitues "on" and what its inital state should be, thus saving you the digitalWrite. It defaults to LED_BUILTIN and on many dev boards it is active LOW, i.e. when you write 0 its turns on and goes off when you write 1. So here, we tell it to start "off" which is HIGH for the LED_BUILTIN on a Wemos D1, If that's confusing, I agree, but Esparto worries about all that for you. The Esparto.pinMode defaults are ...,HIGH, LOW); for "normal" LEDs so if yours is one of those just write: Esparto.pinMode(MY_LED,OUTPUT); as you would do normally, where MY_LED is set to your chosen active HIGH "normal" pin.
The next line is where the action happens - all of it. The syntax may look a) new b) odd c) horrible, and if you don't know what a C++ "lambda function is, look it up now. A good explanation can be found here. You don't need one for Esparto, the name of an ordinary function will do e.g. onPinChange - but using the lambda saves you having to write a whole extra function whose core is juist one line - in this case pulseLED.
Esparto's pulseLED does exactly what it says on the tin: it pulses or "blips" an output pin for a given number of milliseconds. In our case we choose just one millisecond which may seem as if its going to be waaay to short for our eyes to see. The sound sensor - when calibrated correctly - is going to be throwing binary 1s and 0s into pin D6 faster than you can dream of so when you "stack up" a lot of 1ms pulse into a second you get...well, you have seen the video!
So this weird "lambda" thing just calls pulseLED and because we have used the "raw" version of Esparto's many input pin types, we will get every* flicker. The pin value is passed to the lambda (or your own function) every time it changes* in the v parameter. So we filter out only the 1s (a bit like a RISING interrupt - if you know what that is - and a forthcoming blogpost will explain why with Esparto, 99% of the time you don't need to).
If it makes you feel easier, the following does exactly the same:
...

void onPinChange(int v){

if(v){
  smartPins.pulseLED(1);
  }
}

...

Esparto.Raw(D6,INPUT_PULLUP,onPinChange);
...
It's just that the lambda version allows me to make the (much more) astounding claim of "...in only 6 lines"! Well worth the effort, I thought.
And that's all there is to it. If you are not impressed, then think of this:
If you change the Esparto line to: ESPArto Esparto(yourSSID.yourPWD); a number of wonderful things occur.
Firstly, you will be abe to see a webserver running on your tiny device that allows you to watch the pins flash on and off, reconfigure itself in numerous ways and even simulate receiving MQTT commands...Oh, I almsot forgot: it responds to Amazon's Alexa.
If that sounds all a little too flashy(1) then be aware you can also flash any LED with just 1 line: flashLED(1000,myPin) for example. Or flash a series of pulses in PWM style, e.g. flashLED(1000,25, myPin) will give a 250ms pulse (25% of 1000) every 1sec (1000ms). Enough? What about flashing a repetetive pattern such as S-O-S in morse code? Yes, you guessed it: flashLED("... --- ...",myPin). You can even have many LEDs all flashing at different rates, patterns etc without any problems and with only a few lines of code.
If a raw pin is no use to you, choose from:
- Debounced
- Encoder
- EncoderAuto
- Latching
- Polled
- Reporting
- Retriggering
- Timed
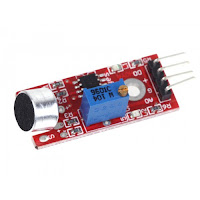
One important point to note is to power it from the 3.3v rail. NOT the 5v! Connect the lead labelled DO (Digital Output) to your chosen pin on your ESP8266, nodeMCU etc - Esparto works on pretty much any dev board with an ESP-12 module on it. The demo uses a Wemos (now LOLIN) D1 mini and I chose GPIO12 which is Arduino digital D6 and turn the music up LOUD! Seriously, those cheap sensors are not very sensitive and you will need to be very close to the speaker. Also, you will have to calibrate the sensor by twiddling the tiny trimpot until it is just on the edge of going wild...then sit back and enjoy.
In part 2, we will look at a slightly more advanced version that a) uses a different technique from Esparto's built-in pulseLED function and b) uses a rotary encoder to "tweak" the LED response for a much more subtle and pleasing effect. Don't worry, as you may expect by now, its only a few extra lines.
*as long as it happens no less than 120 microseconds after the previous one...a forthcoming article will explain this and why using notoriously tricky interrupts may well be a thing of the past since Esparto


