Before we begin
 |
| Typical tact switch - click to buy 100 for less than $2 |
And a locking or "toggle" switch which stays down once pressed and has to be pressed again to release it, like this:
 |
| Typical toggle switch - click to buy |
Let's consider the state of a GPIO pin to which either of these is connected. First the tact switch will go from 0 to 1 and then back to 0 again very quickly. Do you want to react to the 0 or the 1? The toggle switch on the other hand will go from 0 to 1 and may well stay that way till you power off your device. Or it may go back from 1 to 0 a few seconds later when you press it again.
Now imagine you only have tact switches, but you want your app to behave as if they were toggle switches.You would need to monitor a 0 to 1 transition and then hold some internal state denoting "on". The next time you get a 0 to 1 transition you would have to remember is was already "on" (in your program's mind) and obviously set your internal state to "off".
Conceptually, we have created a difference between a 1 state and being "on" as well as "0" no longer meaning "off"...enter the Esparto method of "raw" and "cooked".
Raw is simply the current binary value of the pin. Cooked is the on/off state your program needs to know. In the above example, if you tell Esparto your tact switch is a "Latching" switch, it will do all of the above for you, i.e. the raw state will go from 0 to 1, but the cooked state will go to 1, or conceptually "on". When you press and release again, the raw state will (again) go from 0 to 1, but this time Esparto will set the cooked state to 0 or conceptually "off".
Once you have got your head around that, imagine a PIR sensor. Typically they will re-trigger themselves and stay "on" while ever anything big and warm (like a burglar) moves within their field of view. They will stay that way until a certain time has elapsed after the last detected movement. Digitally, we might have something like:
1...0....1........0.....1....................0
where the dots represent the passing of time. The first 1 might be our burglar entering the garden, so on goes the security light - he freezes and the sensor drops back to zero, but the light doesn't go off yet because the gap between the 0 and 1 is too short for the timeout. Then he moves again, for a longer time and then jumps back over the fence. Many dots later the PIR has detected no movement and so turns off.
Esparto has a "Retriggering" type where the raw pattern will be exactly the same, but the cooked value will be:
1.................................................0
Which is to say that you will get told when to turn on the light and when to turn off the light, which - let's face it - is all you wanted to know in the first place. Esparto takes care of resetting the timer on any intervening raw inputs, but only notifies you via the cooked input when something "interesting" happens.
Debouncing
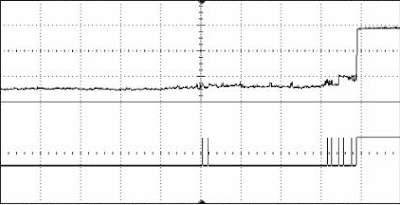
To complicate matters, no switch in reality actually behaves as simply as described above, they "bounce". This means that instead of the tact going 0...1 it might go 01010...1..0......1, bounce back and forth as the springy mechanical contacts settle.(just thing of a carton boi-oi-oi-ongggg! noise). It might look something like this:
If you hook that switch to a light, it will flash on and off horribly before staying on. The tricky process of making sense of all those ups and downs is called "debouncing". There is much more to it than this, read more here if you are interested, but the good news is: Esparto takes care of all that for you too. No matter how bouncy the raw switch gets, you will get a clean cooked 0..1 every time.
Now we can return to image of the web UI: the top row of LEDs are the raw pin values and the bottom row (with only two LEDs in it, because the demo code only defines two pins) is the cooked value. In between is the mapping between ESP8266 GPIO numbers and Arduino digital pin numbers - very handy to make sure your wiring is correct!
The LEDs flicker as close as possible to the real-time status of the pin so you can actually see what your code is doing.
In part 2 and onwards, we will look at the lower panels and the wide range of facilities that Esparto provides.


No comments:
Post a Comment